Showing posts with label natural. Show all posts

Tuesday, September 20, 2011

Tuestorial: Make Your Own Bath Scrub


After the success of my Fizzy Bath Bombs, I've felt really excited about looking into what other beauty products I'd be able to recreate on my own. I thought about making some soap...but, to be completely honest...I feel like making soap is a bit too advanced for this Katy girl.

I read somewhere that you can make bath scrubs with just simple items in your kitchen... OOoooo...into it. I mean...what kind of baker would it be if I didn't feel I would have totally have all the necessary ingredients and supplies to create a little personal spa in my bathroom.

Here's the breakdown of a basic Brown Sugar Scrub recipe.

1 c. brown sugar (lightly packed)
1/2 c. sweet almond oil
1 tsp. vitamin E
1/2 tsp vanilla extract

Turns out...like bath bombs, some of the ingredients are a bit harder to find than "just look in your pantry".
I dunno who thinks that we all have Vitamin E laying around in our cupboards, but I sure didn't. I didn't really know where to look for this type of supply...and I felt like buying capsules and cutting them open would be a huge mess actually...

Then I remembered Hilary from A Slice of Delight (who is away for a year...we miss her)...she was telling me about BrambleBerry.com. Oh my oh MY what a great little website o' fun! It's a great resource for at-home spa making and they also have essential oils on there as well. To my surprise...they had Vitamin E and Sweet Almond Oil. (Note to reader - I am easily surprised by many things)

I decided that making scrubs for just me...well, just isn't as fun... so I headed to my best friend Lauren's house on Sunday and brought all of my supplies with me as well as some empty jars I had laying around.

HOW TO:

It's almost embarrassing how easy making this is...
all you need is a bowl...measure out your recipe...dump all of the ingredients in together and stir... then portion out your scrub into different glass containers.

TIPS:

We found that there's really no wrong way to go about this...but you would want to make sure that you use a glass container for storing your scrub so that it can have some shelf life. None of the ingredients listed below will go bad over time...so you shouldn't have to refrigerate it either. I also think you may NOT want to refrigerate it since the cold would likely effect the structure of the oils.


EXTRA CREDIT!

What's really totally awesome about making scrubs is that there is that flexibility to find a recipe and then expand onto it. You just want to make sure you keep the ratio between the oils and the salt/sugar about the same so that you're sure the consistency isn't a big muddy mess when you're in your shower.After Lauren and I had so much fun with the Brown Sugar Scrub...we experimented and made out own scrub recipe.

Here's ours for you to try at home.

The Infinity (And Beyond) Huckleberry Pie Salt Scrub:

1 c. salt (we used Himalayan Pink Salt - fine coarse from Bramble Berry)
1/2 c. sweet almond oil
1 tsp. vitamin E
1 tsp. Cinnamon
1/2 tsp. vanilla
1 tsp. Real Huckleberry Honey (you can use any flavored honey here)

And... just for fun... and a good belly laugh...I'd like to share with you our backdrop concept...with thumb in the photo no less (not recommended for use on Etsy.)


If you're an Etsy seller in the San Francisco Bay Area, contact Jen from Mama's Magic Studio about joining SFEtsy!

Tuesday, August 30, 2011

Natural Yarn Dyeing Tuestorial - Part One


As I mentioned in my Button Blog Post a couple weeks ago... my family is a crazy crafty bunch - I wouldn't have it any other way. And you'd think I would have learned my lesson with the button "situation" but I sparked another craft project that's quickly becoming a huge family project. Like Whoa.

Just over 2 months ago I was at Green Apple (my all time favorite SF book store) searching through the craft books. To be truthful, I need another craft book like I need a hole in my head, but I looked anyway and ended up picking up a book called Harvesting Color: How to Find Plants and Make Natural Dyes. The imagery is captivating in this book. I walked home while thumbing through this gorgeous book...only slightly tripped on the sidewalk a couple of times...no big deal.


I had my nose in the book the rest of that evening. Each chapter is organized by season...as in the season best to forage for that natural wild flower/plant. And each plant has AMAZING photos of the yarn after dying, the plants, a recipe for each plant dye and an illustrated chart which shows exactly where this plant might be located within the USofA.

I had been planning a road trip to Montana with my boyfriend at the time and I thought...self, let's go walk in the middle of the woods and pick up some supplies.

Just pick up some Supplies?! Not really as easy as that... but at the time I was just really excited about the concept that I could find natural dye on my own, and just POOF, dye something.

Really the process ended up being much more complicated than that. But for all of the work...Natural Hand Dying is possibly one of the most rewarding things you'll do.

Knowing that I couldn't do this on my own...I very "casually" gave my mom my book that I found.... "Hey Mom...thought you'd like this... maybe we can go pick some plants while we're in Montana this summer". I handed the book to her with pages already marked of all things found in Nevada, Idaho and Montana since that's where our trip would be taking us.

The next thing I knew, my mom had called me to say that she'd been to her favorite store in Oakland to obtain the first part of the materials we needed. The game was afoot and before I knew it we had all that we needed to dye yarn on our vacation. Yes, a vacation isn't really a vacation in my family unless we have a serious family project.

BASIC PROCESS:
1 - Gather Materials Needed
2 - Prepare the Yarn for Dying
3 - Forage for Supplies
(Okay, you could do this with step #1, but I separated it out into it's own section)
4 - Preparing the Dye/Extracting Color from Materials
5 - Dyeing the Yarn
6 - Finishing Touches & Tips


STEP ONE: Gathering Materials Needed
Yarn
Strainer (small one (around 6" across) will work well for this)
A Wooden Spoon
Measuring Utensils, like cups and spoons
Small Kitchen Scale
Rubber Gloves
Thermometer
Plant Materials (foraged)
Water
At least 2 Large Stainless Steal Stock Pots - and I mean LARGE

STEP TWO: Preparing your Yarn for Dying


First, you gotta remove the oil from the fiber. For 1 pound of raw wool: fill 3-4 gallons of water in a pot with detergent (like Dawn). Put the wool in and slowly simmer for 45 minutes. After cooling your yarn, be sure to rinse it as well. This will help to make sure you have no contaminants in your yarn.

In order to bring the most life out of the color you'll be dying your yarn, you should likely consider using a Mordant first on your yarn to make sure the yarn takes the color. Using one of your large stock pots (marking it as your Mordant Pot so you don't cross contaminate later), you want to fully submerge and soak your yarn for the time stated within the recipe you've chosen. Mordants are needed to set the color when using natural dyes. Different mordants will give different results.

Alum: (Aluminum Potassium Sulfate)
This is the most widely used mordant. Be careful not to use too much with wool, otherwise you will get a sticky feeling that doesn't come out.
Solution is 4 oz. Alum to 1 oz. cream of tartar.

Consulting a book like the book I mentioned above will teach you the differences between the multiple mordants that you can chose. Your local yarn supply store should carry some mordant or be able to guide you in the right direction.

STEP THREE - Forage for Supplies

What's funny is that when I first thought of doing this...I thought this was the bulk of what you would be doing...and in reality, preparing your yarn takes MUCH longer than the actual foraging. OK...so maybe I got lucky. My cabin sits in a mountain by a lake...we had 3 different types of plants that were running a muck up in the mountains of Montana. If you're a city girl...you might want to consider a short road trip for some of the materials you'll need for this...or you can get some natural dye from your local yarn shop and skip this step all together.

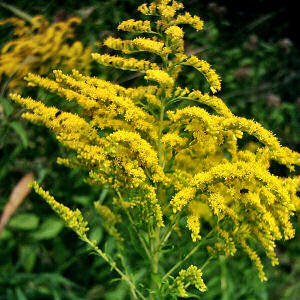
This was by far my favorite part of the process. After reading and practically drooling over that Natural Yarn Dye Book...we had already found that there was lots of Goldenrod and Sage to dye from.

By the time I got up to Montana with my boyfriend, my parents had already found a field about a mile away from our cabin that was speckled with goldenrod wild flowers. The recipe called for basically a whole stock pot full of flowers... knowing that we wanted to do a couple rounds of dye with this plant material... each of us gathered around half a bag full of flowers. Additionally...we did keep in mind that it would be better for the plant if we didn't snip off all of the flowers so that we weren't hurting the environment around us.


TO BE CONTINUED...
I hope I left you in suspense!
Because of the complexity of this project, I have written this blog entry in two parts. Part Two will come next Tuesday the 6th of September and will consist of steps 4-6... stay tuned for more amazing results!


If you're an Etsy seller in the San Francisco Bay Area, contact Jen from Mama's Magic Studio about joining SFEtsy!
Related Posts Plugin for WordPress, Blogger...