Showing posts with label organic. Show all posts

Tuesday, September 6, 2011

Natural Yarn Dyeing Tuestorial - Part Two


Part Two is here! Paaaarty!
For part one, please click here.

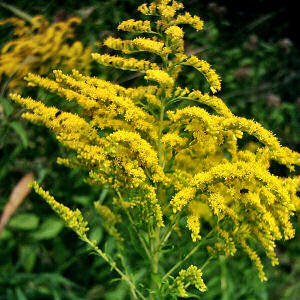
Last week, we left off just after I had foraged for materials with my family and had placed the wildflowers in a large stock pot.
Here’s what happened next.

4 - Preparing the Dye/Extracting Color from Materials
At this point, you want to submerge your materials in water and bring them up to temperature and hold it there for a while ensure that all of the available dye has been extracted from your materials.

Each material is different...so be sure to follow your recipe. When we used the Goldenrod flowers, once we extracted the color, there was no more to suck out of the poor flowers... but, later, when we used Sagebrush, the recipe did say that we could put the stems back into the water batch to take out more pigment.
In my research, I did find a good general guide for extracting color from plant materials.

- FOR FLOWERS - boil 20 minutes; strain off the water to make the dye bath.
- FOR BARKS, ROOTS, DYEWOODS - soak overnight, boil 1/2 hour, pour off and save the extract (this is the dye solution), add more water and boil again. Do this boiling and saving three times to make the dye bath. -or more times, as long as dye continues to extract.


(image: the goldenrod is inside it’s pot and ready for a steaming hot-spring experience!)


After you've extracted the color from your plant material, you want to discard or set aside your plant materials that you boiled. Use tongs at first to grab the larger pieces of plant materials and then use a hand-held strainer to grab the rest of the little bits of leftovers. Certain plant materials can be boiled again, as I mentioned, over and over again... But in most cases, you want to just put your extras straight into the compost. See... Even if you boil it over and over to extract more color again – your plant only has a limited amount of pigment to extract – so the first extraction will always be the most pure in the color and pigment.


After you don’t see anything but colored water...your dye is ready to use. YAY!!
At this point, You can set it aside if you're not ready to use your dye. However, just like most things, your dye WILL SPOIL...so you'll want to either refrigerate it or use it right away so that you're sure that all your hard work obtaining this isn't lost.

5 - Dyeing the Yarn

Basic Idea – you can just put your yarn into the bath and then wait (based on your recipe)... You want to wait for as long as it would take for the dye to truly soak into your yarn fully... This will keep the color from fading quickly and it will also ensure that you get the most color into your yarn as you can. Therefore, a 10 minute soak likely won’t work... You’ll want to keep the dye hot (on the stove) and expect to keep your yarn in there for at least a half hour.

More complex ideas and techniques:
Before I began with my yarn, I did read this book - Hand Dyeing Yarn and Fleece: Custom-Color Your Favorite Fibers with Dip-Dyeing, Hand-Painting, Tie-Dyeing, and Other Creative Techniques... It was a great resource for inspiration. I learned that if I only put part of the yarn into the bath, than my yarn will take some of the color and wick into the rest of the yarn. I obtained a gradient look to my yarn this way and I know that when I make something with my yarn later down the line, there will be a variation in colors. You can dip your yarn later down the line in another dye bath as well if you’d like to get a rainbow effect if you’d like as well.

The hardest part of this process for me was that you had to sit and wait. No swirling the yarn around in the dye. You have to be patient and know that the yarn will take the color without your assistance.


(image: this was a Madder Dye Bath - it looks a little like guts here)

6 - Finishing Touches & Tips

When you’re ready to take your yarn out of the bath... Wear protective gloves to keep your hands away from the dye and also away from the hot water. Some recipes ask for you to hang the yarn, then rinse the yarn and hang it again... Others just ask you hang it and let it dry. Either way...you’ll want to make sure you have a place to hang your yarn once it’s complete and you’re not going to be dripping dye all over your bathroom...
We used a large plastic tub to transport the yarn from the kitchen to the clothesline.

TIPS:
Oh man do I have a lot of tips and little factoids about this... Here are just some that I can think of at this moment...

BE PATIENT – this process takes a full day... Some mordents may take a FEW days... Finding materials takes time... Boiling them takes time. I for sure could see how some Etsy sellers will sell their hand-dyed yarn for upwards of $100 because the more colors you put into the work, and the more materials you have to find... It’s just seriously time consuming and it’s a practice of patience.

BE CREATIVE – I guess, for this crowd, this won’t be the hardest part... But when you’re doing this...you want to think about the end product... What will you use this yarn for...what types of colors do you need to obtain...and what type of effect to you want at the end of the process?

Another creative thing that my mom did was she kept all of the paper wrappers that came with the yarn so that the yarn’s original information could be reattached to the skein once we finished up and everything was dry. Then, she would write on there how that yarn was made and with what.

KNOWLEDGE IS POWER – Did you know that you can’t find blues in the USofA?! Oh dear... My heart sank that I would not be able to forage for a blue color... Mostly, in the US you can pick and find greens, browns and yellows. Reds and some purple shades can be found in berries, but the color will fade more quickly than other shades and it’s messier for sure to go into that color pallet. All the colors available to us (if you were to forage for your own) are SUPER pretty... But not blue. After I left Montana, my mom did do an “exotic” dye bath and used an African pigment that she had bought online. And... To the same note – make sure to TAKE NOTES! What the book says will give you a good idea of what might happen... But what actually happens might be something totally different. So keep track so that you can come back to it.

ONLINE is your resource! You can pretty much find anything you need for this online... You really don’t’ need to go hiking in the woods to do this. I do think that your end product would be worth more if you could say that you actually hand-picked the plants that created the vibrant color – but if you’re looking to just do a couple batches of this at home here in the Bay Area... Go ahead and just look and see what you can find online. There are a TON of resources, recipes and also supplies out there for the taking.

RESEARCH FIRST – Since each plant material, yarn and mordant call for different considerations to be made... Be sure you fully prepare yourself before you get yourself into this project. Also, even after you dye your yarn one time...you can go ahead and do an after-bath of mordant that will change the color of your yarn...many books will give you a full break down of what will happen for each recipe direction you chose.


READING MATERIALS:

Harvesting Color, by Rebecca Burgess (she’s from San Geronimo); Copyright 2011, published by Artisan, a Division of Workman Publishing Company
 
“Global Color: A Survey of Natural Dyeing” by Kristine L. Vejar; Copyright 2011 – Kristine is the owner of A Verb for Keeping Warm in Oakland and she wrote this pamphlet
 
A Dyer’s Garden, From Plant to Pot Growing Dyes for Natural Fibers by Rita Buchanan; Copyright 1995, published by Interweave Press
 
Dyes from Plants, by Seonaid Robertson; Copyright 1973; published by Van Nostrand Reinhold Company
 
Create your own Natural Dyes by Kathleen Schultz; Copyright1975, published by Sterling Publishing Company
 
Dye Plants and Dyeing – a handbook a special printing of the Brooklyn Botanic Garden Record Pants & Garden, Vol 20, No. 3, Eleventh printing, July 1976
 
 
RESULTS!!!
The following photos are meant to inspire you! Here are some of what I did while I was in Montana...and some of what my mom did after I left... She’s gotten REALLY into it....as you can see. I think this kinda of thing is very addicting – so watch out! :)


(image: Golden Rod and Sage dyed yarn on the clothesline)


(image: Sage dye. Copper, tin, alum mordants. Iron afterbath for darker colors.)


(image: Sage and logwood dyes. The Logwood is the African dye)


If you're an Etsy seller in the San Francisco Bay Area, contact Jen from Mama's Magic Studio about joining SFEtsy!

Tuesday, August 30, 2011

Natural Yarn Dyeing Tuestorial - Part One


As I mentioned in my Button Blog Post a couple weeks ago... my family is a crazy crafty bunch - I wouldn't have it any other way. And you'd think I would have learned my lesson with the button "situation" but I sparked another craft project that's quickly becoming a huge family project. Like Whoa.

Just over 2 months ago I was at Green Apple (my all time favorite SF book store) searching through the craft books. To be truthful, I need another craft book like I need a hole in my head, but I looked anyway and ended up picking up a book called Harvesting Color: How to Find Plants and Make Natural Dyes. The imagery is captivating in this book. I walked home while thumbing through this gorgeous book...only slightly tripped on the sidewalk a couple of times...no big deal.


I had my nose in the book the rest of that evening. Each chapter is organized by season...as in the season best to forage for that natural wild flower/plant. And each plant has AMAZING photos of the yarn after dying, the plants, a recipe for each plant dye and an illustrated chart which shows exactly where this plant might be located within the USofA.

I had been planning a road trip to Montana with my boyfriend at the time and I thought...self, let's go walk in the middle of the woods and pick up some supplies.

Just pick up some Supplies?! Not really as easy as that... but at the time I was just really excited about the concept that I could find natural dye on my own, and just POOF, dye something.

Really the process ended up being much more complicated than that. But for all of the work...Natural Hand Dying is possibly one of the most rewarding things you'll do.

Knowing that I couldn't do this on my own...I very "casually" gave my mom my book that I found.... "Hey Mom...thought you'd like this... maybe we can go pick some plants while we're in Montana this summer". I handed the book to her with pages already marked of all things found in Nevada, Idaho and Montana since that's where our trip would be taking us.

The next thing I knew, my mom had called me to say that she'd been to her favorite store in Oakland to obtain the first part of the materials we needed. The game was afoot and before I knew it we had all that we needed to dye yarn on our vacation. Yes, a vacation isn't really a vacation in my family unless we have a serious family project.

BASIC PROCESS:
1 - Gather Materials Needed
2 - Prepare the Yarn for Dying
3 - Forage for Supplies
(Okay, you could do this with step #1, but I separated it out into it's own section)
4 - Preparing the Dye/Extracting Color from Materials
5 - Dyeing the Yarn
6 - Finishing Touches & Tips


STEP ONE: Gathering Materials Needed
Yarn
Strainer (small one (around 6" across) will work well for this)
A Wooden Spoon
Measuring Utensils, like cups and spoons
Small Kitchen Scale
Rubber Gloves
Thermometer
Plant Materials (foraged)
Water
At least 2 Large Stainless Steal Stock Pots - and I mean LARGE

STEP TWO: Preparing your Yarn for Dying


First, you gotta remove the oil from the fiber. For 1 pound of raw wool: fill 3-4 gallons of water in a pot with detergent (like Dawn). Put the wool in and slowly simmer for 45 minutes. After cooling your yarn, be sure to rinse it as well. This will help to make sure you have no contaminants in your yarn.

In order to bring the most life out of the color you'll be dying your yarn, you should likely consider using a Mordant first on your yarn to make sure the yarn takes the color. Using one of your large stock pots (marking it as your Mordant Pot so you don't cross contaminate later), you want to fully submerge and soak your yarn for the time stated within the recipe you've chosen. Mordants are needed to set the color when using natural dyes. Different mordants will give different results.

Alum: (Aluminum Potassium Sulfate)
This is the most widely used mordant. Be careful not to use too much with wool, otherwise you will get a sticky feeling that doesn't come out.
Solution is 4 oz. Alum to 1 oz. cream of tartar.

Consulting a book like the book I mentioned above will teach you the differences between the multiple mordants that you can chose. Your local yarn supply store should carry some mordant or be able to guide you in the right direction.

STEP THREE - Forage for Supplies

What's funny is that when I first thought of doing this...I thought this was the bulk of what you would be doing...and in reality, preparing your yarn takes MUCH longer than the actual foraging. OK...so maybe I got lucky. My cabin sits in a mountain by a lake...we had 3 different types of plants that were running a muck up in the mountains of Montana. If you're a city girl...you might want to consider a short road trip for some of the materials you'll need for this...or you can get some natural dye from your local yarn shop and skip this step all together.

This was by far my favorite part of the process. After reading and practically drooling over that Natural Yarn Dye Book...we had already found that there was lots of Goldenrod and Sage to dye from.

By the time I got up to Montana with my boyfriend, my parents had already found a field about a mile away from our cabin that was speckled with goldenrod wild flowers. The recipe called for basically a whole stock pot full of flowers... knowing that we wanted to do a couple rounds of dye with this plant material... each of us gathered around half a bag full of flowers. Additionally...we did keep in mind that it would be better for the plant if we didn't snip off all of the flowers so that we weren't hurting the environment around us.


TO BE CONTINUED...
I hope I left you in suspense!
Because of the complexity of this project, I have written this blog entry in two parts. Part Two will come next Tuesday the 6th of September and will consist of steps 4-6... stay tuned for more amazing results!


If you're an Etsy seller in the San Francisco Bay Area, contact Jen from Mama's Magic Studio about joining SFEtsy!

Friday, June 10, 2011

Friday Feature - Mermaid Lane Perfumes

Hi Everyone! It's Friday!

And it's not just any Friday! Today is the SFEtsy Craft Party!, Jen's Birthday (mamasmagicstudio)!, AAAaand... this is officially the very first interview we've done with a perfume shop! I don't know about you guys, but my brain might not be able to handle all this excitement!


I was fascinated to learn about Stacey's shop Mermaid Lane Perfumes and her creative, organic process. The scents she uses sound exotic and harmonious. As a customer, you also have the ability to customize a scent! The bottles she uses to store the essence are absolutely precious! My favorite bottle is the sweet sounding Green Roses perfume composed of lavender and rose.


Enjoy the interview, everyone. Then head over to pick up a perfume for your next garden party! ;)


1. What is your shop name and URL?

Mermaid Lane Perfumes
mermaidperfume.etsy.com


2. To which Etsy Teams do you belong?

Let's Talk Bath and Body Team, Etsyians for Disaster Relief, Busy Moms of Etsy, Sampler Village Etsy Team, SF Etsy


3. Please tell us about the items in your Etsy shop. What do you make? How did you learn your craft? What is involved in your creative process?

I make mostly organic natural perfume from plant aromatics. After a visit to the perfumeries at Grasse, France over a decade ago, I began collecting different aromatics from around the world. When I started studying their scent, I realized I could smell pitches through my nose much the way I detected perfect pitch through my ears.


4. Tell us two (or more) other interesting things about you.

I write young adult ficton, am an avid reader, and if I had a free day to myself I would be snorkeling. I have two sassy children, an understanding husband, a fondness for baby goats, and allergies to shellfish and anything with fur.


5. What inspires your creations?

I'm always inspired by the world around me, particularly the ocean. I created my natural perfume, Starfruit, after a trip to Hawaii where I got to sample so many unusual tropical fruits like star apple, sapodilla, guava, starfruit.


6. What is your favorite item in your shop (currently for sale or previously sold)? Why is it your favorite?

Lagoon Natural Perfume.
I based it on Mermaid Lagoon from Peter Pan, where all the beautiful mermaids sit pinning starfish in their hair. It smells of neroli blossom, pikake, and green tea.


7. If you had to be an animal for one week, which animal would you choose to be? And what would you do?

A dolphin or a peregrine falcon. You could go to the places humans can't.


8. Give us some insight on how you personally, or your shop, gives back to your community.

At least one item in my shop is dedicated to raising money for issues I care about. Right now, all proceeds from my Treasure natural perfume will go to Global Giving on behalf of victims of the Japan tsunami. Treasure is a triple floral of the rare champaca flower, roses and jasmine.


9. Where else can we find out more about you and/or your creations?

mermaidnaturalperfumes.blogspot.com
facebook.com/mermaidperfume
twitter.com/mermaidperfume


10. Is there anything else you'd like to tell us about your shop or your work?

Yes! I specialize in custom blends. That's my favorite part of being a perfumer, working with people to create unique signature scents.


Thanks for stopping by to check out the interview! And thanks to Stacey for the sweet interview! Have a great weekend!


If you're an Etsy seller in the San Francisco Bay Area, contact Jen from Mama's Magic Studio about joining SFEtsy!


Related Posts Plugin for WordPress, Blogger...