Showing posts with label glitter. Show all posts

Tuesday, February 19, 2013

Tuestorial: Recipe Box

Most of the time, I come across enticing recipes on Pinterest or blogs to recreate. This has left my favorite recipes scattered across my computer, print-outs stuffed in containers throughout my kitchen and email drafts saved. Wouldn’t it be nice if they were in one, easy-to-grab location? It also would be nice if it looked pretty awesome too! Goodwill gave me that answer in the form of a slightly beat-up recipe box.


Materials Needed:

  • old recipe box or wood box
  • your recipe collection
  • index cards (size that fits in your recipe box)
  • acrylic paint
  • paint brush
  • Thickers or sticker letters
  • glitter

Step 1:

You can find recipes boxes to use at thrifts stores or wood boxes at craft stores.
Prep your recipe box to paint. I decided to paint mine two different colors (top part bright green, bottom part tan). I tested the paint on the inside to make sure it would work with the box material.


love my laminator
Step 2:

Paint your box and while it’s drying, prepare your recipe cards. I printed my recipes on 3x5 index cards that fit inside my recipe box. Since I have a laminator, I decided to laminate all my recipe cards (you can also visit any major office store or Kinkos to get yours laminated too!).


Any excuse to play with glitter

Step 3:

Take the Thickers (sticker letters) and cut out the letters you want to use. Peel off the top layer to expose the sticky top. Sprinkle with glitter of your choice (probably the best part here). Shake off excess glitter.


Step 4:

Apply a second coat of paint if needed. Once it’s dry, attach the Thickers to the outside of your box. Voila! Ready for your next cooking adventure.


If you're an Etsy seller in the San Francisco Bay Area, contact Our Team Captain about joining SFEtsy!

Tuesday, February 5, 2013

Tuestorial: Heart Garland


Craft confession: I've never made garland before. Ideas flood sites like Pinterest with easy and cute ways to add garland to your next party or Holiday decorations. I decided Valentine's Day is the perfect Holiday to make my own! I've been enjoying it in my living room and will be sad when the days comes to take it down.


Materials Needed:
  • red construction paper 
  • scissors 
  • white glue
  • glitter
  • ribbon
  • newspaper or a large piece of scrap paper


Step 1:

First things first...I cheated a little bit. I have a wonderful tool called the Accuquilt Go! Baby Fabric Cutter. I use it to makes an assortment of shapes for my fabric needs. I have a die cut with 3 different heart shapes that I used to cut my paper with (shhhhh, I'm pretty sure it states not to use on paper, but guess what? It was totally fine). 

If you don't have a cheat to cut heart shapes, it's easy enough to find a heart shape to use as a stencil.  Just trace and cut! I decided to mix it up and use two different heart shapes.


Add glue... 
Add glitter...
Admire
Step 2:

My favorite part...glitter! I used Martha Stewart's tinsel glitter in garnet and amethyst (different color for each heart shape). 

Place newspaper or a large piece of paper on your work surface to catch the glitter. Apply white glue around the edge of a paper heart. Sparkle glitter over glue then shake access off. It was easier to apply glue and glitter to half the heart at a time. 


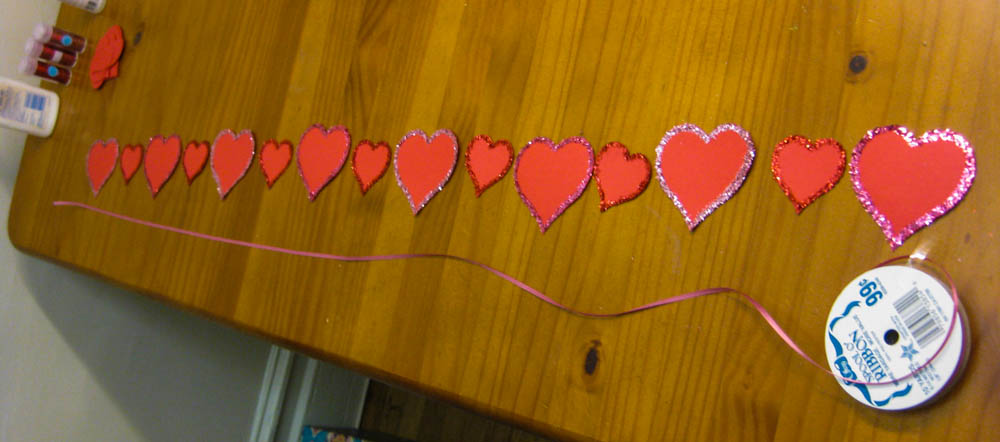
Row of hearts
Step 3:

Once glue has dried, it's time to string your garland! Lay out all your hearts how you would like to display them and your desired length. Flip them all over and lay across your string or ribbon. Tape the string to the back of all your hearts.


Love fest in my living room
Step 4:

Hang and enjoy! 


If you're an Etsy seller in the San Francisco Bay Area, contact Our Team Captain about joining SFEtsy!

Tuesday, January 8, 2013

Tuestorial: Repurposed Holiday Cards

While putting away my Holiday decorations, I wasn’t sure what to do with the stack of cards from family and friends. I didn’t have the heart to throw them away and the various designs were eye catching. I thought they could have a second life as gift tags or small cards for the next Holiday season. Easy and useful!


Holiday essentials


Materials Needed:
  • old Holiday cards
  • decorative edge scissors
  • hole punch
  • glitter (optional)
  • glue (optional)

Chop, Chop
All together now
Step 1:

Review your stack of cards and select the areas to cut. Use decorative scissors to cut with.

Add some punch 
Ready to use as gift tags for next year!
Step 2:

Punch a hole on the edge of your pieces to use as a gift tag. If there is writing on the other side, use white-out or a blank label to cover.

Sparkle
I never need an excuse to use glitter 
Step 3 (optional):

Use glue to add glitter to the cards. Now you are ready for next year's gifts!


If you're an Etsy seller in the San Francisco Bay Area, contact Our Team Captain about joining SFEtsy!
Related Posts Plugin for WordPress, Blogger...