Showing posts with label recycling. Show all posts

Tuesday, April 1, 2014

Tuestorial: Shoe Sachets

Hello SF Etsy team! It's officially Springtime which makes me think about cleaning and organizing (exciting life!). After cleaning out my dresser, I had several pairs panty hose I didn't want to just throw away. I decided something could be done with my pile of scrap fabric, old panty hose, and disorganized shoes. This project can also be used to add a wonderful scent to your dresser drawers or luggage!

Turning scrappy into pretty!
Materials:

  • Panty hose 
  • Fabric scraps
  • Lavender
  • Scissors 
  • Needle
  • Thread

Step 1:

Cut your piece of panty hose depending on the shoe you are filling. I wanted this piece to fit snug inside the toe part of my heels to keep the shape while making my shoes smell good. The "toe" part of the panty hose is obviously the best part of use, but all of it can be used for this project!


Step 2:

Fill the panty hose with lavender. If not using the "toe" part of the panty hose, you will need to hand sew one end before filling.

You're pretty…on the inside
Step 3:

Sew the open end close. I did a fast whip stitch to secure. I didn't worry about it looking pretty or perfect since it will be living inside my shoe.


Step 4:

Select a piece of scrap fabric that will cover your piece of lavender-filled hose. Cover the piece of fabric around it and "wrap" the edges (just like wrapping a gift!). I did another whip stitch on both ends to complete. You could also sew these as drawstring bags!


Step 5:

Now it's ready to be used! You get to open your closet to a lovely scent and a beautiful sight!


If you're an Etsy seller in the San Francisco Bay Area, visit Our Team Page about joining SFEtsy!

Monday, October 17, 2011

DIY Display Tour: Urban Ore, Berkeley

Holiday show season is here! Part of preparing for the shows is coming up with ways to display your items. One must consider, table type, table covers, backdrops, signage, seating, displays, etc.- not to mention easy packing and keeping the weight light.

Hardware stores are fabulous places… but have you considered salvage yards and thrift stores? You can save a small fortune on base supplies and ‘ready to wear’ displays.

The other week I went to Urban Ore in Berkeley for inspiration. If you haven't been there yet, set aside a bunch of time- it's 3 acres of recycled goods!

I now take you on a photo tour of the nearly endless possibilities…

‘Ready to Wear’ Displays
Ok- maybe you aren’t so handy with tools or don’t have the space or the time to create your own. No worries! There are many ‘ready to wear’ displays available- baskets, glass/wooden/metal trays, shelves, glass front cabinets, window shutters, fireplace screens, mannequins, and even sections of actual retail display racks.


‘Some Assembly Required’ Displays
Have you ever thought about using an old wooden chair on top of the table for height? It’s an instant shelf and with some screws or hooks around the seat edges etc. you can hang plenty of items from it. How about using an old paned window with screws in the framing to hang items? Same thing goes for old cupboard doors and odd items like vintage washboards. How do you make them stand- screw a couple hinges between them to create a folding screen type of unit. Use old frames (you can even do a quick coat of paint) but use fabric or printed photos and some corkboard underneath it where the photo goes and create mini free-standing cork boards to pin your items to.


Seating, Lighting and Backdrops
Many salvage yards and thrift stores have tons of options here. You can find everything from retail and home lighting to room screens and folding chairs for you booth- even in painted colors! Maybe you aren’t into a rattan folding screen, but think of it spray painted apple green behind you with a sign hanging from it. It can help create a ‘booth’ feel even with just a table top display.


Raw Materials
Need height on your table- use old floor boards with old books or cement blocks between them. Want instant flat backgrounds under your items on the table- use old tile or mirrors.


A Final Note- Put It All Together
You can have a very pulled together look even with salvaged items. Pick one or two materials and use only items with those materials. Example: Glass and Iron- You can use dark iron wire racks and towers for hanging and a mix of glass trays on the table. Even if the trays are different styles, if they are all glass they will look consistent.


Look For Inspiration
You can search online for inspiration on how to use these materials. Use a search engine or check out Flickr or other photo sharing websites for these keywords:
Salvage display
DIY Display
DIY Craft Display
Show Display
Craft Display
Booth Display
(enter items you show) Display – i.e. ‘Quilt Display”

Enjoy creating!

Tara Evans -Velvet Otterhound


If you're an Etsy seller in the San Francisco Bay Area, contact Jen from Mama's Magic Studio about joining SFEtsy!

Tuesday, August 16, 2011

Inspired by a button.


In 2006, I was procrastinating my Master's Thesis project by endlessly browsing the internet. One day while on Ebay, and I found a tin of vintage buttons that I ended up winning for just under $5. I didn't know what I wanted to do with these things... but the uniqueness of each button captivated me.

I sifted through my tin for hours...and hours. Thesis-Shmesis...my creative juices were flowing... buttons just seemed much more important.
I started to collage the buttons together... I made pins and hair accessories for my friends... sold each for $10 and gave all the money to an organization that raises money to give scholarships to women.


Soon, my family started to take notice of my new "obsession" and a line of jewelry was formed. My mom found a "recipe" for crocheted button bracelets that my Great Grandmother made during the depression. Meanwhile, my dad started to sculpt bracelets out of jewelry parts and beads that he would purchase at the local bead shows. The tin of buttons I started with turned into over a million buttons, fully organized between shank and non-shank styles...color coordinated, labeled and stacked neatly in a button-jewelers dream workshop.

One tin of buttons... turned into a button-jewelry business!
Just one little spark of creativity...from a basic search on the web to pass the time...lead my family and I down a path where we've raised a lot of money for an organization that we all believe in.

Do you remember when you first had your bright idea? What pushed you to keep the business going and what inspired you to start selling on Etsy?


HOW TO MAKE A BUTTON HEADBAND!
This is a great project to make for any little ones or to spice up your workout headband.

Materials:
hot glue
elastic headband
buttons (vintage is better than buying new ones...just any extra buttons you have laying around the house)
beads


STEP ONE:
Create a color story. This can be the most challenging part...but basically, you want to chose a color story. There is a great site called Color Lovers that you can find some interesting color combinations made by users and inspiration.

STEP TWO:
Glue your largest buttons first as a base.
I found that two large coat sized buttons work well for a base.
You want to get the type of headband that has the metal clasp on it...otherwise, you would have to glue straight to the elastic and eventually your buttons will fall off.
The metal clasp is the most secure place to glue since it doesn't flex like the rest of the headband.

STEP THREE:
Working from largest button sizes (the base) to the smaller beads...continue to glue onto your base. Be careful of your fingers and the glue...working with such small objects and hot glue can burn a bit... this may not be the most kid-friendly craft project. Also, I tend to use odd numbers of everything (minus the two buttons for the base)...this allows the finished piece to have a very beautiful asymmetrical look with little to no brain work on your part.

STEP FOUR:
I like to use beads to give some character to my button headbands. I will find some stone beads and use them first and then use some cheap smaller beads as accents.

When layering with hot glue and your materials...try to use as little glue as you can. These small buttons and beads don't need much. Luckily, this craft is pretty forgiving. If you use too much glue...quickly place a bead or two on the glue area... your accident will end up looking like a genius cluster of sparkles!

Enjoy!


If you're an Etsy seller in the San Francisco Bay Area, contact Jen from Mama's Magic Studio about joining SFEtsy!

Friday, February 4, 2011

Friday Feature -- Girl on Bike

Time and time again, I am inspired by the ingenuity of my fellow Etsy sellers. It's so impressive how folks with a creative bent can find beauty and function in unexpected places. This week's featured Etsy artist, Kendra of Girl on Bike, is a perfect example -- before learning about Kendra's shop, I never would have imagined that stylish, striking jewelry could be made from recycled bicycle tires! I especially like these "Native Slender" earrings. So classic and yet unusual!
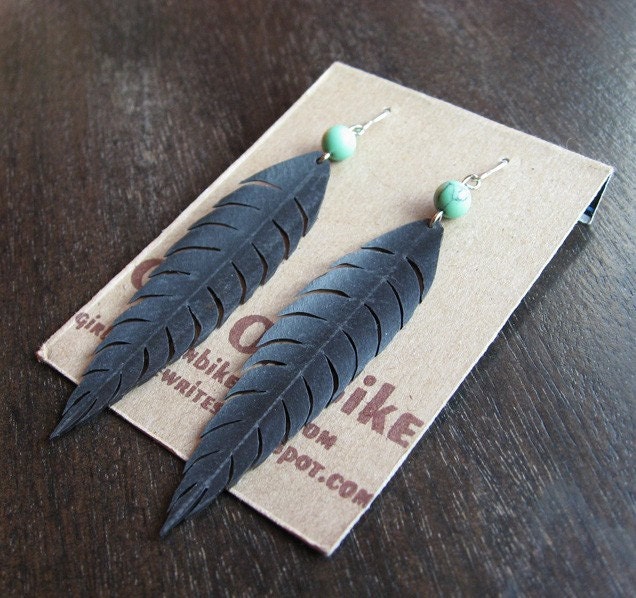
Enjoy the interview!

1. Please tell us about the items in your Etsy shop. What do you make? How did you learn your craft? What is involved in your creative process?

I make earrings using recycled/upcycled bicycle inner tubes.

As an avid cyclist I was horrified at the amount of inner-tube rubber that I would see in trash cans at bike shops. This, and my amazing boyfriend Dan, inspired me to find a creative, marketable, and longer lasting use for those tubes that are so full of holes they can no longer be patched and used for their intended purpose.

I am very inspired by nature and natural elements. Most of my designs center around feather shapes and currently the colors blue, gold, & silver. People often think the inner tube material looks like leather until they actually touch it.

2. To which Etsy Teams do you belong?
I'm a member of SFEtsy, East Bay Team, and ETC.

3. Tell us two (or more) other interesting things about you.

I got in to business young, opening my first boutique at 22. In 2009 I decided I wanted to live a simpler more conscious life and made some drastic changes. I closed my store down, got rid of my car & got a bicycle, lost a bunch of weight, sold off or gave away most of my unnecessary "things", and really got in to things like gardening and urban foraging.

Now I live off the money I make selling my earrings in local boutiques and have plenty of free time to explore the activities I have always been interested in. I run a local Bay Area Clothing Swap group . I have a group for Urban Foraging the East Bay, and I also started a group for Food Swap Events where people can get together and swap their home made or home grown foods (ie: jams, breads, granola, pickles, etc.).

4. What is your favorite item in your shop? Why is it your favorite?

Right now my favorite earrings are my Oak style in silver:
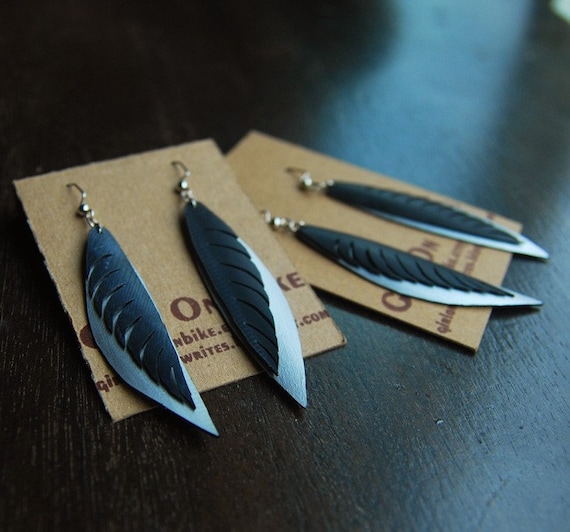
I wear these all the time and love how large they are while still being really lightweight.

5. What does buying and selling local handmade mean to you, and how has it affected your life?

I try to buy locally as much as possible. I want to make sure as most of the money I spend goes to bettering my community and improving my local economy. If I can't make it myself then I look for someone locally who can. I even translate this in to my eating habits and focus on buying only fruits and vegetables that have been grown in California...that is, for the produce I can't grow myself in my backyard garden.

6. Where else can we find out more about you and/or your creations?

I have a blog where I write about Food, Bikes, & Sustainability: http://girlonbikewrites.blogspot.com


If you're an Etsy seller in the San Francisco Bay Area, contact Jen from Mama's Magic Studio about joining SFEtsy!
Related Posts Plugin for WordPress, Blogger...